1. Quick start
Your first run: follow these steps and you have a set of pictures
| 1 | Drag a video (or a folder of videos) onto the window, or click Add videos. |
| 2 | Leave the defaults (Fixed number, 24 snapshots, Skip first 10 seconds, Skip blank frames on) and click Capture. |
| 3 | Remove any snapshot you do not like: hover over it and click Remove this snapshot. |
| 4 | Click Export settings to choose the format, width and an optional watermark, GIF or contact sheet, then Done. |
| 5 | Click Save (Ctrl+S). The output folder opens when it is finished. |
By default the pictures go to Pictures\Video Snapshots, in a folder named after each video.
2. The main window
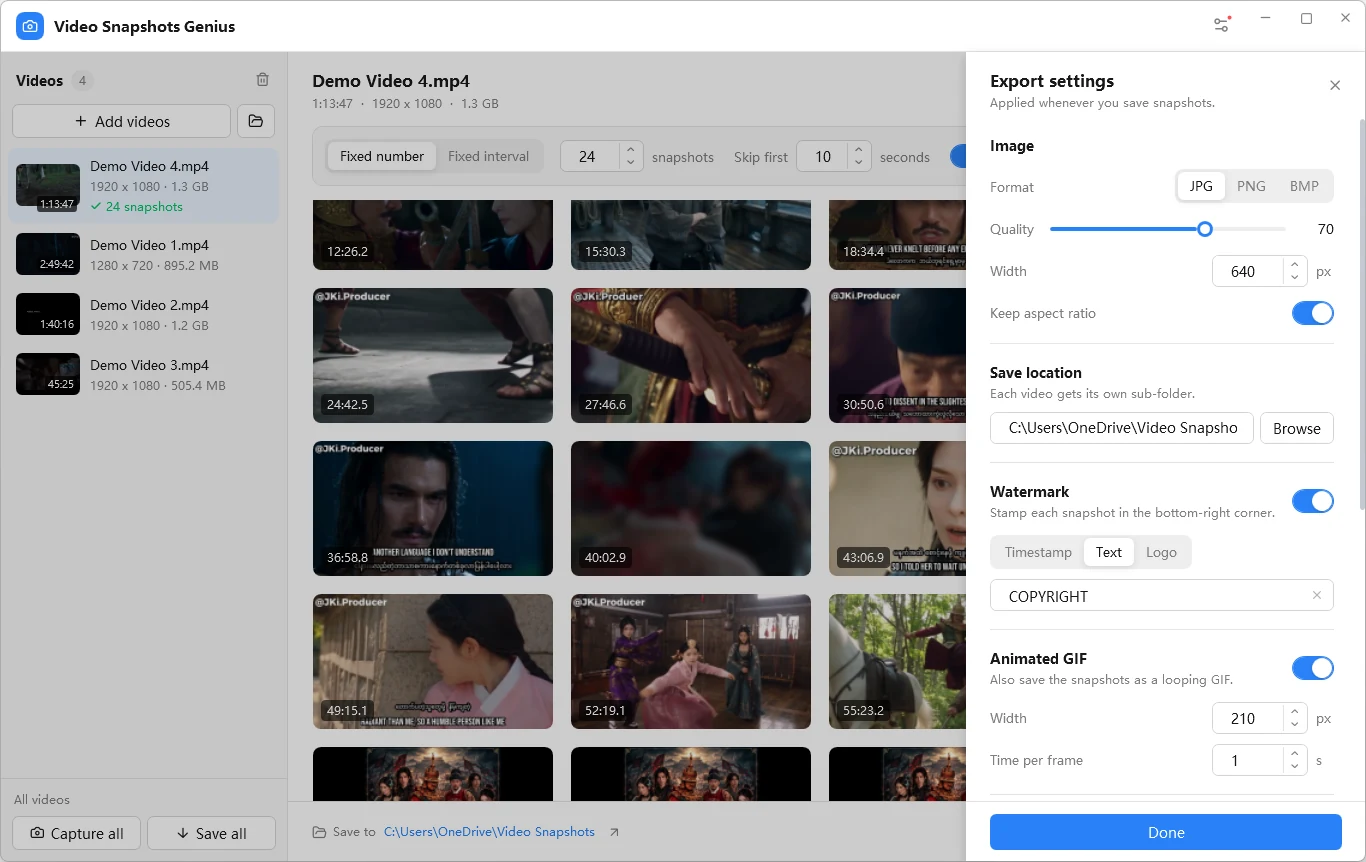
With four videos added and 24 snapshots captured for one of them
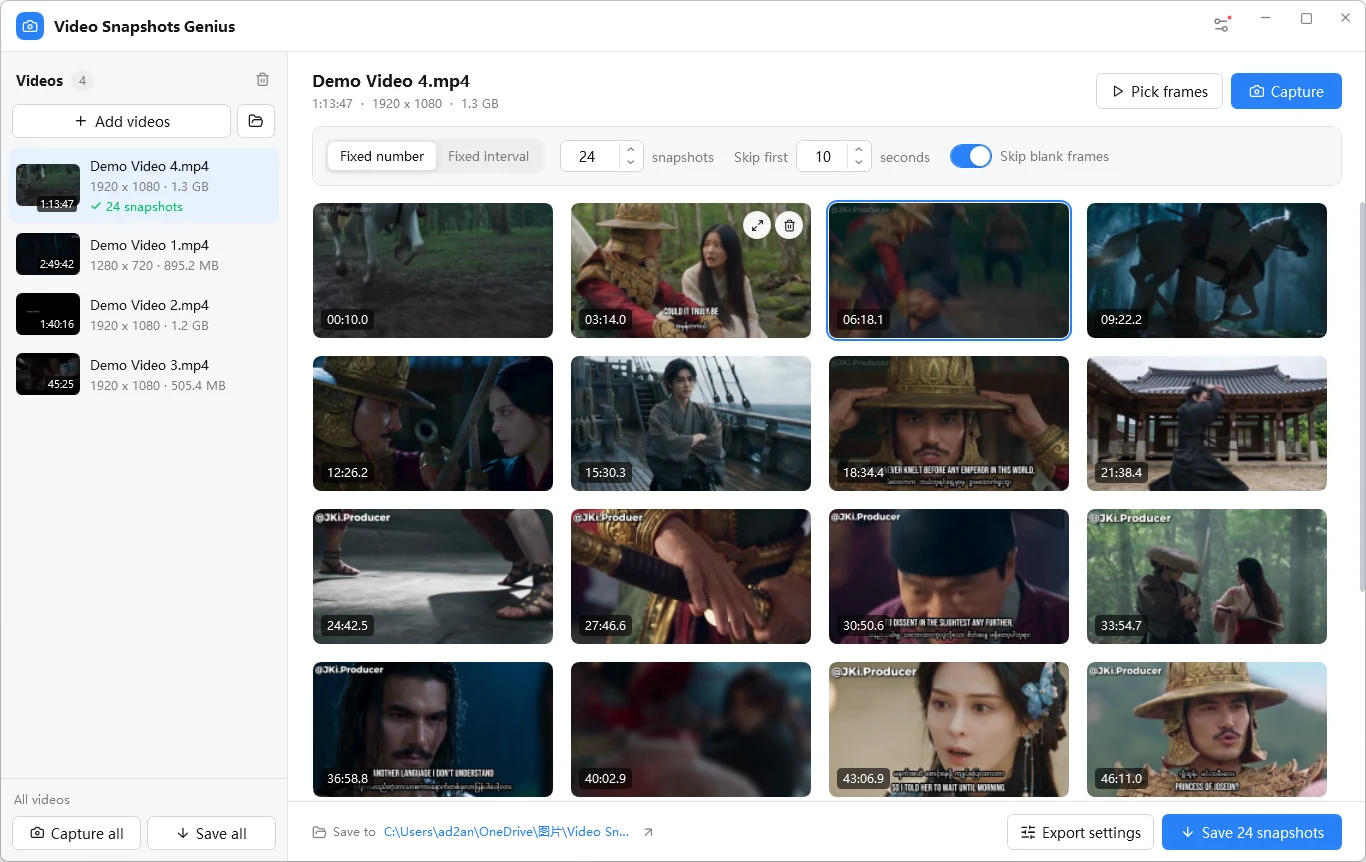
Title bar
The Settings button (slider icon) at the top right opens the settings window. A red dot on it means the copy is not activated yet.
Videos list
Left column: the videos you added with the number of snapshots captured for each, and the buttons to add, clear, Capture all and Save all.
Capture settings
Above the grid: Fixed number or Fixed interval, Skip first, Skip blank frames, and the Pick frames and Capture buttons.
Snapshots and bottom bar
The grid shows the snapshots of the selected video. At the bottom: Save to (output folder), Export settings and Save.
Before you add anything, the middle shows a welcome page where you can drop videos or click Choose videos or Open a folder.
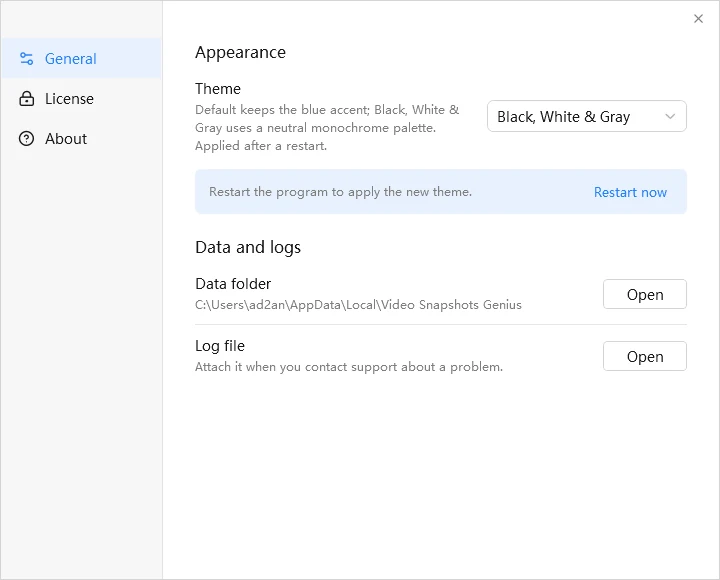
Settings window
| General | Theme: Default (Blue) or Black, White & Gray; a restart applies it. Data and logs: open the data folder or the log file (attach the log when you contact support). |
| License | Enter your name, e-mail and license key; once activated it shows your registration details. |
| About | The program, its main features, the company and contact details, and the FFmpeg license. |
3. Adding videos
One file, many files or a whole folder
| Method | What it does |
|---|---|
| Add videos | Pick one or several files (also Ctrl+O, or Choose videos on the welcome page). |
| Add all videos in a folder | Adds every video in the first level of the folder (sub-folders are not included). |
| Drag and drop | Drop files or a folder anywhere on the window when “Drop to add videos” appears. |
The program reads each video’s duration, resolution and codecs and makes a cover thumbnail; a progress bar shows how far it is and Cancel stops it. Videos already in the list are skipped. Click a video to see its snapshots, hover over it and click Remove from list to drop one, or Remove all videos to clear the list.
Supported formats
3G2 3GP ASF AVI DIVX DV F4V FLV M2TS M2V M4V MKV MOV MP4 MPE MPEG MPG MTS MXF OGM OGV RM RMVB TS VOB WEBM WMV
H.264, H.265/HEVC, VP9, AV1, MPEG-2 and MPEG-4 and more decode without any extra codec: FFmpeg 9.0 is installed with the program.
4. Automatic capture
Evenly spaced snapshots from the whole video
| Setting | What it does | Default |
|---|---|---|
| Fixed number | The chosen number of snapshots (1 to 100), spread evenly over the whole video. | 24 |
| Fixed interval | One snapshot every N seconds (1 to 36,000). | 60 s |
| Skip first | Start this many seconds in, to avoid titles and logos (0 to 3,600). Ignored when it is 90% or more of the video. | 10 s |
| Skip blank frames | Drops near-solid frames such as black, white and single-colour transitions. | On |
- Capturing runs from Skip first up to about one second before the end (5% of the length for a very short video), because the last frames of many files cannot be decoded cleanly.
- In Fixed interval mode the number of snapshots is (duration minus skipped seconds) divided by the interval, and at least one.
- Skip blank frames treats a frame as blank when 98% or more of its sampled points match one colour. A black frame with only a logo or a credit line counts as blank; a dark scene with content does not.
- In Fixed number mode a blank planned shot is replaced by trying a quarter, a half and three quarters of the way to the next planned shot; the time shown on the snapshot is where it really came from. Fixed interval mode does not replace, to keep the spacing even.
- If a blank frame could not be replaced you get one notice saying how many snapshots are missing. Frames you pick by hand are never filtered.
Capture works on the selected video, Capture all (bottom of the video list) on every video in turn. Cancel stops it and keeps the videos already done. Snapshots keep the original video resolution; they are resized only when you save.
Capture again replaces everything
Pressing Capture (or Capture all) again clears all existing snapshots of that video, including frames you picked by hand. To combine both, run Capture first and use Pick frames afterwards.
5. Picking frames by hand
For the exact expression, slide or subtitle
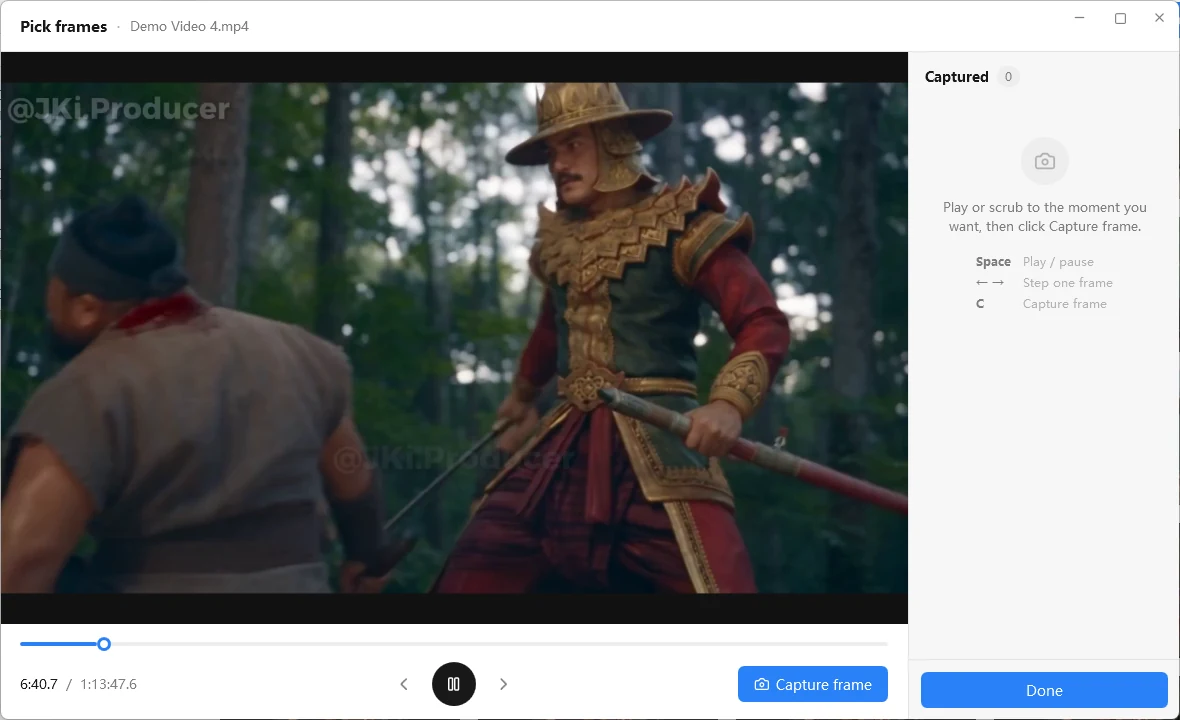
- Select the video and click Pick frames to open the player.
- Play, or drag the timeline, to the moment you want; use ← and → to step one frame.
- Click Capture frame or press C. The picture appears in the Captured list, where Remove deletes it.
- Click Done. The captured frames are added to the video’s snapshots and sorted by time with the others.
6. Viewing and editing
Double-click a snapshot to open the full-size viewer, which is also an editor
Scroll to zoom, drag to move, and double-click to switch between fit-to-window and 100%. The buttons at the bottom right are Adjust (Ctrl+E), Annotate, Copy (Ctrl+C), Save as (Ctrl+Shift+S, a PNG, JPG, BMP or GIF at the original resolution without watermark) and Apply (Ctrl+S).
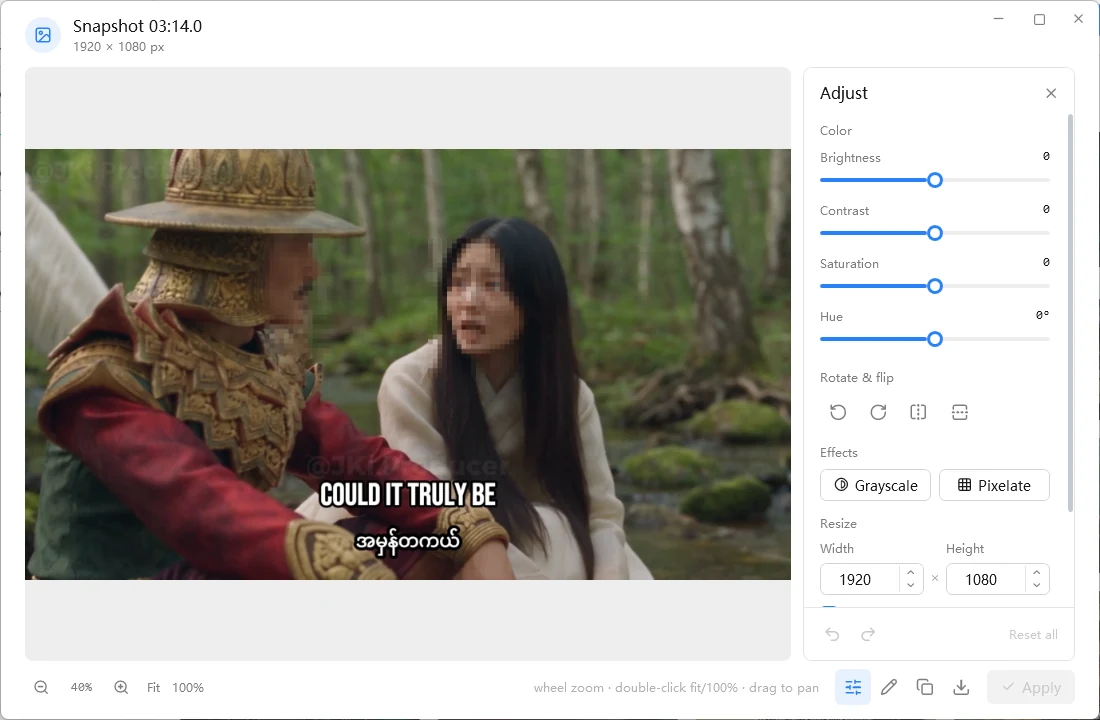
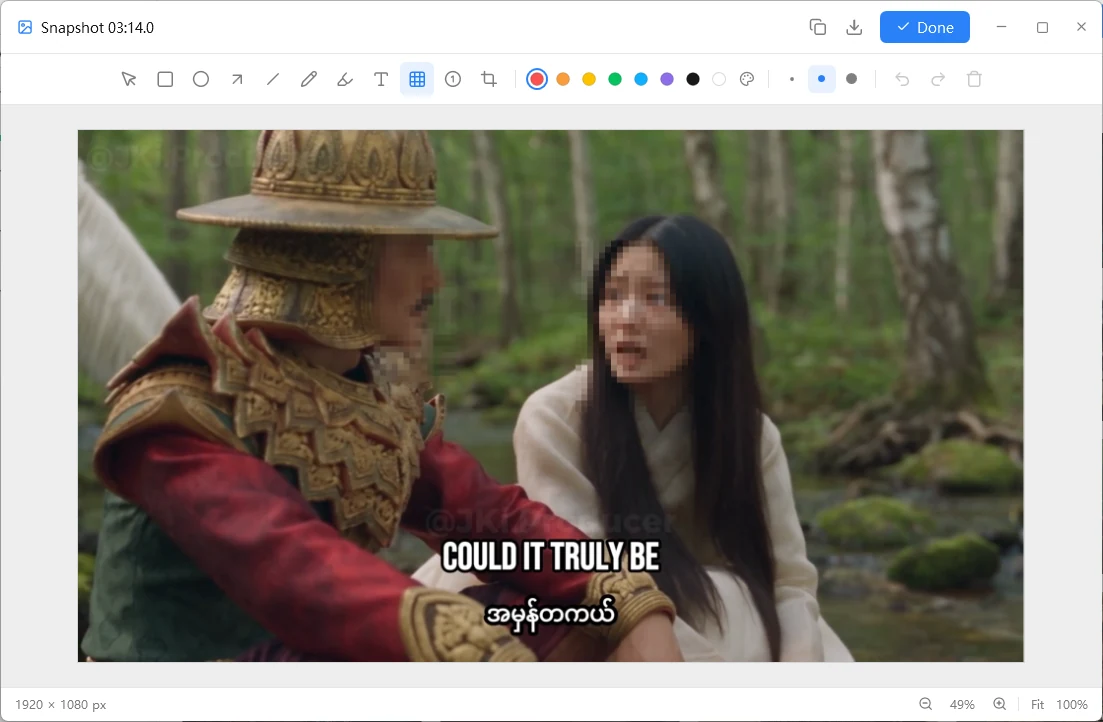
Adjust
Color: brightness, contrast and saturation (-100 to +100) and hue (-180 to +180 degrees). Rotate & flip: 90 degrees left or right (Ctrl+L, Ctrl+R), horizontal and vertical flip. Effects: Grayscale and Pixelate. Resize: width and height with Keep aspect ratio; without it choose Stretch, Crop or Pad. Undo and Redo (Ctrl+Z, Ctrl+Y) and Reset all are at the bottom.
Annotate
Tools: Select (V), Rectangle (R), Ellipse (E), Arrow (A), Line (L), Pen (P), Highlighter (H), Text (T), Mosaic (M), Number marker (N) and Crop (C). Eight preset colours or a colour picker with an eyedropper, and three line widths. Select a mark to move, recolour or delete it; click Done (Ctrl+S) to hand the result back.
Apply is what makes an edit permanent: until then everything is a preview. After Apply the snapshot is replaced, and Save, Save all, the GIF and the contact sheet all use the edited version. If you close the viewer with unapplied changes it asks whether to Apply or Discard.
7. Export settings
Applied whenever you save; remembered when you close the program
Image
| Format | JPG (default), PNG or BMP. |
| Quality | JPG only, 1 to 100 (default 70). |
| Width / Height | Width 10 to 7680 (default 640), height 10 to 4320 (default 360); height is ignored while Keep aspect ratio is on. |
| Save location | Default Pictures\Video Snapshots; click Browse to change it. Each video gets its own sub-folder named after the video. |
Watermark
When on, a watermark is stamped in the bottom-right corner of every snapshot, and also on every GIF frame and every contact-sheet picture. Below 640 pixels wide it scales down to at most 40% of its size.
- Timestamp: the position in the video, for example 00:05:32, in white with a grey shadow.
- Text: your own text, such as © Your Company, in white.
- Logo: a PNG or JPG drawn at its own pixel size; a transparent PNG works best.
Animated GIF
Saves all snapshots of a video as one looping GIF. Width 10 to 3600 pixels (default 210), height follows the first snapshot; Time per frame 0 to 10 seconds (default 1). Frames with another aspect ratio are scaled and centred on black, never stretched.
Contact sheet
Combines all snapshots into one big picture, always saved as collage.png. Pick a Template from its miniature, then set the layout:
- Width 10 to 7680 pixels (default 800); height follows from the number of snapshots and columns, and fonts, shadows and corners scale with the width.
- Columns 1 to 360 (default 3) and Spacing 0 to 200 pixels (default 5).
- Show video info header adds file name, size, resolution, frame rate, duration and codecs; Header title is the big title at the top right (empty hides it; Classic does not use it).
Except for Classic, every template puts its own timecode on each frame, so a Timestamp watermark is then not added to the sheet. Text and logo watermarks still are.
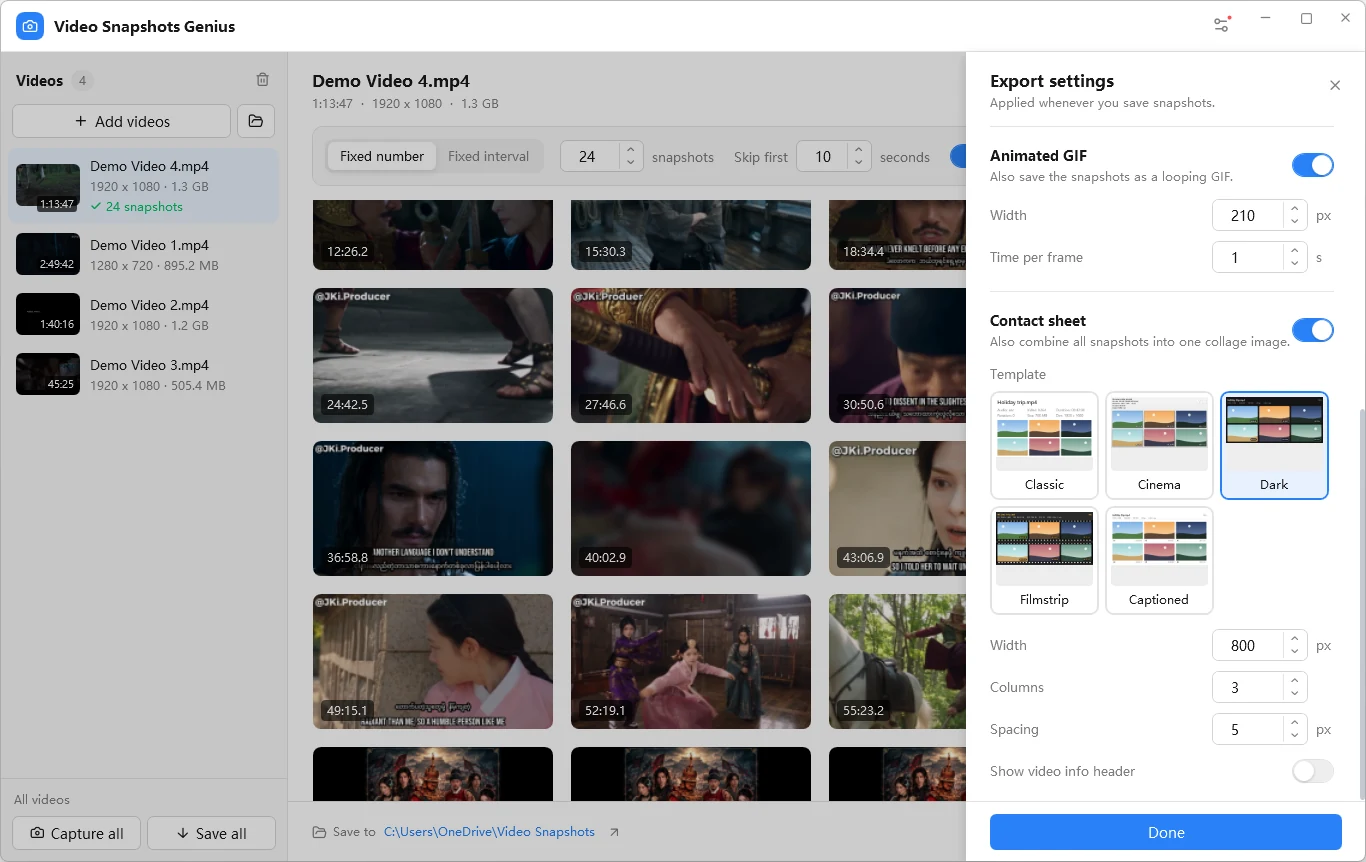
| Template | Look |
|---|---|
| Classic | White sheet, no frames or timecodes; file name and two lines of details on top. |
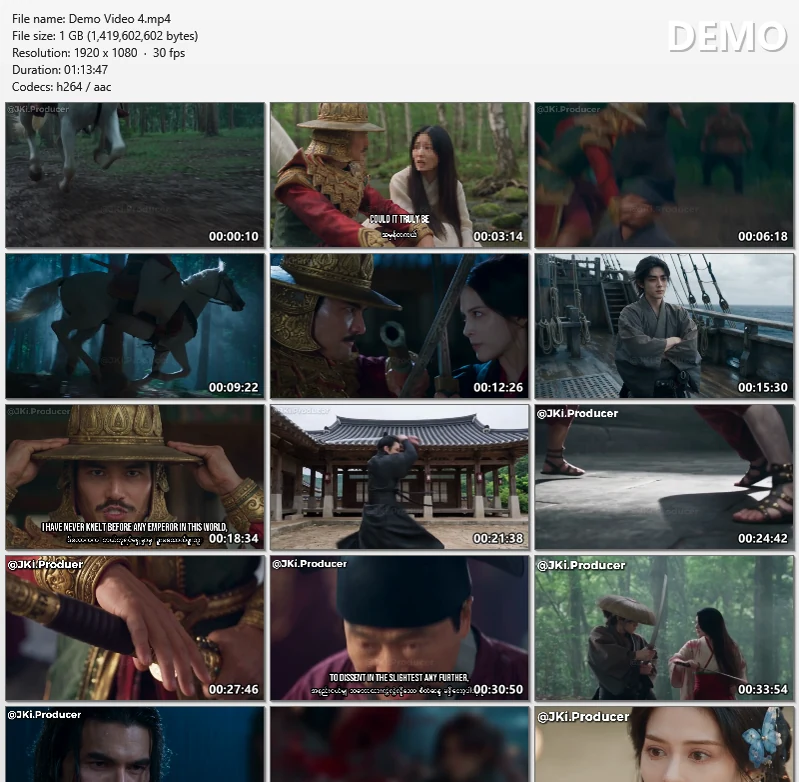
| Cinema (default) | Media-player style: soft grey gradient, header lines on the left and a big title at the top right, shadowed frames and an outlined timecode. |
| Dark | Dark canvas, rounded frames, semi-transparent timecode badges. |
| Filmstrip | Rows of black film with sprocket holes, amber monospace header and timecodes. |
| Captioned | White cards with the shot number (#1, #2 ...) and timecode under each frame. |
8. Saving and the output
Resize, watermark and encode happen now, never before
Save (Ctrl+S, bottom bar) saves the selected video; Save all (bottom of the video list) saves every video that has snapshots. Each snapshot is resized, watermarked and encoded as set in Export settings, and the GIF and contact sheet are made if turned on. The output folder opens when it is done; if a video fails, a message lists the file and the reason and the others are saved anyway.
Pictures\Video Snapshots\
  Holiday.mp4\
    1.jpg            # numbered in time order
    2.jpg
    ...
    24.jpg
    animate.gif      # if Animated GIF is on
    collage.png      # if Contact sheet is on
Saving the same video again overwrites files with the same names, so rename the folder or change the save location first if you want to keep the old results. This is a Cinema contact sheet as exported:
9. Trial and activation
15 days, every feature unlocked
| Stage | What the program does |
|---|---|
| Day 1 | Everything works; no reminders. |
| Days 2 to 15 | Everything works; an unregistered reminder appears each time the program starts. |
| After day 15 | You can still open the program, add videos, browse snapshots and change settings. Capture, Capture all, Pick frames, Save, Save all and the viewer’s Save as and Copy are blocked and show the reminder. |
The 15 days count from the first run and cannot be restarted by reinstalling or deleting files; turning the system clock back does not extend them. The reminder has Buy now, Not now (or Esc) and Already purchased? Enter your license key.
- Click Settings (slider icon, top right) and open the License page.
- Enter Name, Email and License key from your order. Activate stays grey until all three are filled in.
- Click Activate. The program contacts the license server and verifies the result on your PC, then says it has been activated and restarts itself.
Activation needs the internet once. The license is saved in %APPDATA%\VideoSnapshotsGenius\license.dat, so after a new PC or a Windows reinstall you activate again. Keys of other products do not work here. More in the activation guide.
Where things are kept: settings in %LOCALAPPDATA%\Video Snapshots Genius\data.db (saved when you close the program), the log in log.txt in the same folder. The program never checks for updates by itself, so get new versions from the download page.
10. Keyboard shortcuts
| Where | Keys | Action |
|---|---|---|
| Main window | Ctrl+O | Add videos |
| Main window | Ctrl+S | Save the selected video |
| Main window | Esc | Close Export settings |
| Main window | Double-click a snapshot | Open the viewer |
| Pick frames | Space | Play or pause |
| Pick frames | Left / Right arrow | One frame back or forward |
| Pick frames | C | Capture the current frame |
| Viewer | Mouse wheel / drag / double-click | Zoom / move / fit and 100% |
| Viewer | Ctrl+0, Ctrl+1, + and - | Fit, 100%, zoom in, zoom out |
| Viewer | Ctrl+E | Show or hide the Adjust panel |
| Viewer | Ctrl+L / Ctrl+R | Rotate 90 degrees left or right |
| Viewer | Ctrl+Z / Ctrl+Y | Undo / redo |
| Viewer | Ctrl+C | Copy to the clipboard |
| Viewer | Ctrl+S | Apply to the snapshot |
| Viewer | Ctrl+Shift+S | Save as a file |
| Viewer | Esc | Close the Adjust panel, then the window |
| Annotation editor | V R E A L P H T M N C | Select, rectangle, ellipse, arrow, line, pen, highlighter, text, mosaic, number marker, crop |
| Annotation editor | Ctrl+Z / Ctrl+Y / Delete | Undo / redo / delete the selected mark |
| Annotation editor | Ctrl+S | Done |
11. FAQ
Quick answers to common problems
I added a video but it does not appear in the list.
The file extension may not be on the supported list, or the file may be damaged and cannot be decoded. The reason is written to the log file (Settings, General, Log file).
The snapshots are black, or there are fewer than I asked for.
Some videos begin or end with black. Increase Skip first, and keep Skip blank frames on (it is on by default). Fixed number mode looks for a replacement nearby; only when everything around is blank does the count fall short. Fixed interval mode never replaces frames, and a very short video gives fewer shots at a fixed interval, which is normal.
The saved pictures are not the size I set.
With Keep aspect ratio on, only the width counts and the height follows the video's proportions. Turn it off to use both width and height as typed, which may stretch the picture.
The timecode on the contact sheet repeats my Timestamp watermark.
It does not. Cinema, Dark, Filmstrip and Captioned put their own timecode on every frame, so the Timestamp watermark is not added to the sheet. Choose Classic if you want a watermark-style timecode. Text and logo watermarks are still applied.
How do I change or remove the big title at the top right of the sheet?
Edit Header title under Contact sheet in Export settings; empty it to hide the title. Turning off Show video info header removes the whole header.
Saving again replaced my earlier pictures.
Saving the same video again overwrites files with the same names. Rename the folder or choose another save location to keep older results.
Can I still use the program after the trial ends?
You can open it, add and browse videos and change settings, but capturing (including Pick frames) and saving or copying images are blocked until you activate.
Activation says Network request failed.
Check your internet connection and whether a firewall or proxy blocks the program, then try again.
Activation says the license cannot be verified on this computer.
Check that the name, e-mail address and license key match your order e-mail exactly. If it still fails, contact support.
Why does the installer ask for 64-bit Windows?
The FFmpeg decoding libraries the program uses exist only as 64-bit builds, and they need Windows 10 or later with .NET Framework 4.7.2. Windows 7, 8 and 32-bit Windows are not supported.
Did not find your answer? Email service@iotcrazy.com or use the contact form.