1. Quick start
Two steps: set your rules, then click Start
| 1 | Click Add Images or Add Folder, or drag files and folders into the window. |
| 2 | On the Size tab, turn on Resize images and enter a width and height (or choose Common sizes...). |
| 3 | Optional: on the Watermark tab, turn on Add a watermark and type your text or choose your logo. |
| 4 | On the Output tab, pick the output format and quality and check the output folder. |
| 5 | Look at the preview: it shows the processed result and its estimated file size. |
| 6 | Click Start processing. |
The installer for your edition is picture_resize_genius-setup-4.5-x64.exe on 64-bit Windows or ...-x86.exe on 32-bit Windows. It needs Windows 10 or later and .NET Framework 4.5.2 or later; the installer checks for it and offers a download link if it is missing.
2. The main window
The start screen, before any pictures are loaded
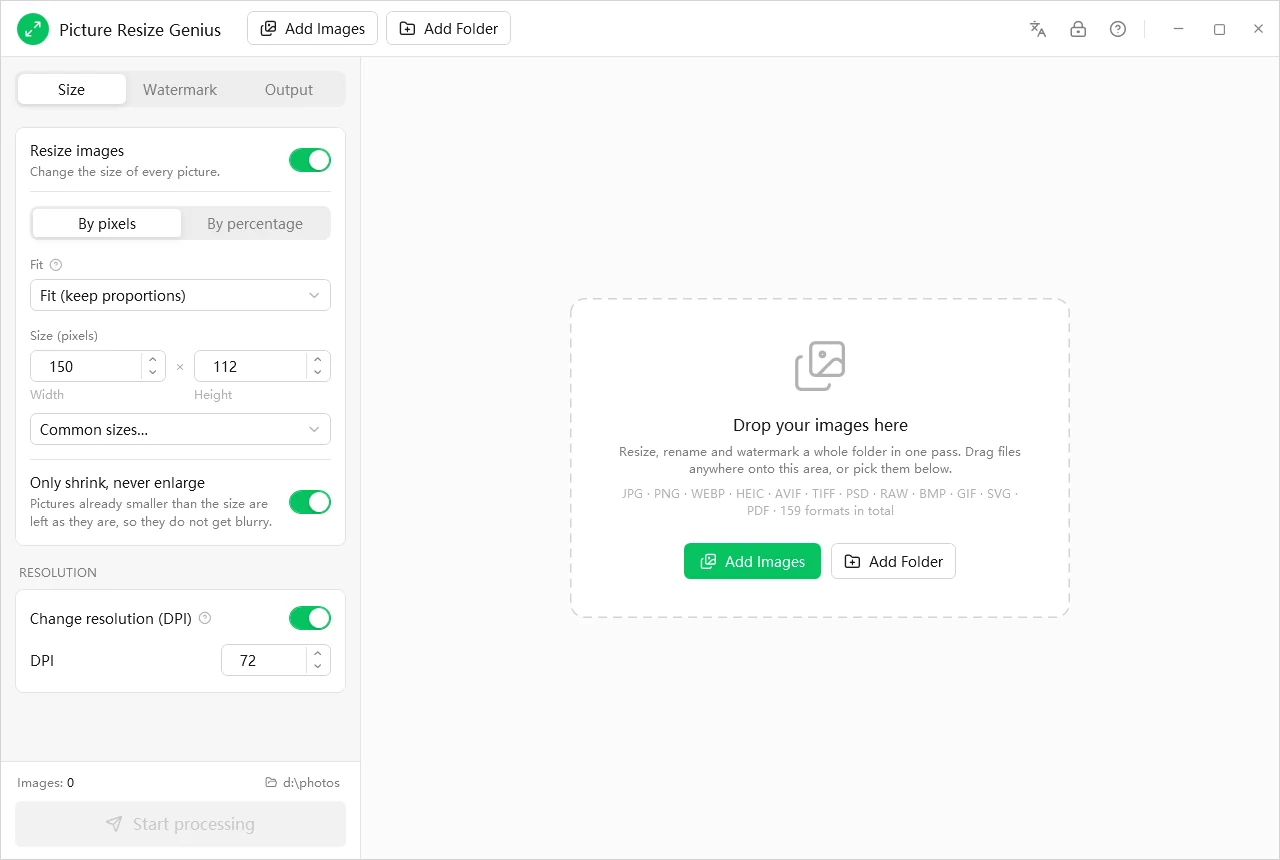
Top toolbar
Add Images and Add Folder on the left; Language, Activate and Help at the far right.
Left settings panel
Three tabs: Size, Watermark and Output.
Centre preview
The drop zone while it is empty, and a before and after preview of the selected picture once images are loaded.
Bottom bar
The image count, the output folder and the big Start processing button; a thumbnail strip appears here once images are added.
3. Adding images
Three ways to load pictures
- Add Images: pick one or more image files.
- Add Folder: add every supported image in a folder at once.
- Drag and drop: drop files or folders anywhere onto the centre area.
The program reads 159 image formats, including JPG, PNG, WebP, HEIC, AVIF, TIFF, PSD, BMP, GIF, SVG, PDF and camera RAW (CR2, CR3, NEF, ARW, DNG, ORF, RW2, RAF and more). Loaded pictures appear in the thumbnail strip at the bottom: click one to preview it. The counter at the bottom left shows how many are loaded. Pictures are auto-rotated to the correct orientation when they are imported.
4. The preview
It updates live as you change settings, so you always see the final result
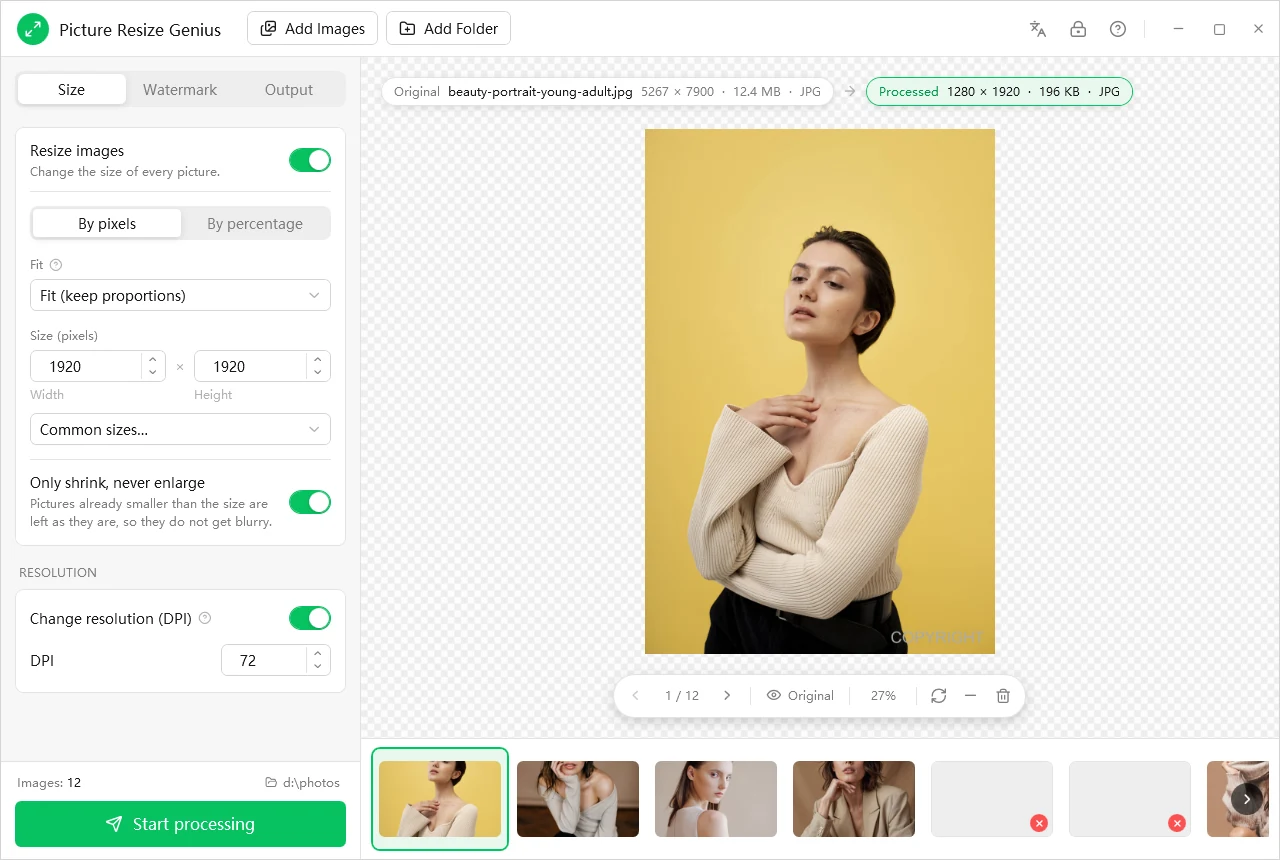
- The bar above the preview shows the Original file (name, dimensions, size, format) and the resulting Processed file (new dimensions, estimated size, format).
- The Original / Processed toggle compares before and after on the same detail.
- The floating toolbar under the picture pages between photos, shows the zoom level, resets the view and removes the selected picture from the batch.
- The preview runs the full pipeline: resize, watermark, output format and quality.
5. Size
Pixel dimensions and resolution
Turn on Resize images, then choose how:
| By pixels | Enter a Width and Height and pick a Fit mode: Fit (keep proportions) scales each picture to fit inside the box without distortion; Crop trims each picture to exactly the box; Fill scales to cover the box and trims the overflow. |
| By percentage | Scales every picture by a percentage; 50% halves both width and height. |
| Common sizes... | A quick list of standard dimensions, such as 1920 x 1080, 1280 x 720, thumbnails, avatars, web and email sizes. |
| Area to keep | For Crop and Fill: which part of the picture to keep, from nine anchor points or Random. |
| Only shrink, never enlarge | Leaves pictures that are already smaller than the target as they are, so they never become blurry. |
Change resolution (DPI) tags the output for print or web with the DPI you set. It changes the stored resolution, not the number of pixels.
6. Watermark
Text or logo, stamped on every picture
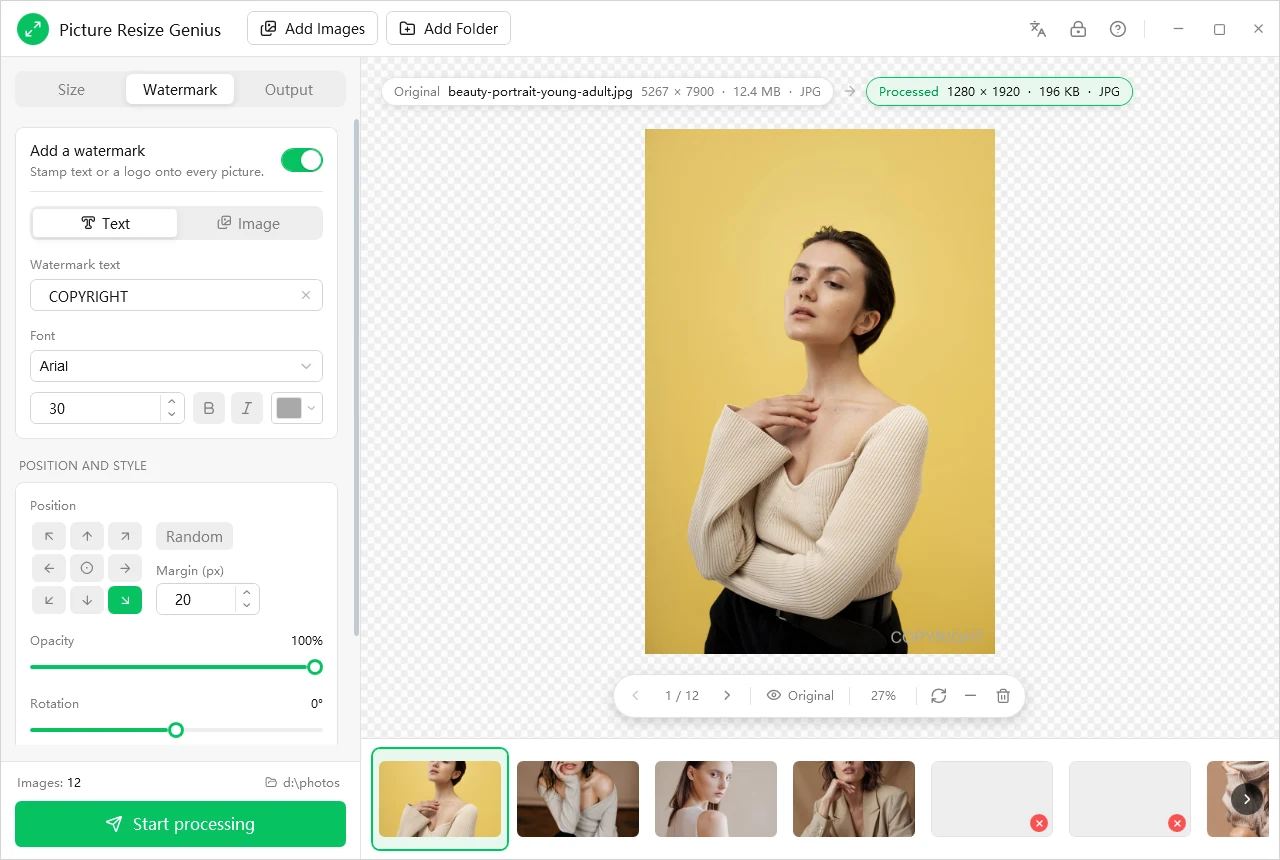
Open the Watermark tab, turn on Add a watermark and choose Text or Image:
- Text: type the Watermark text, then choose the Font, size, bold and italic, and colour.
- Image: your own logo or graphic, in any supported format, with transparency preserved.
- Position: the nine-point grid, or Random; Margin (px) is the distance from the edge.
- Opacity and Rotation (in degrees) shape the look.
The watermark scales with each picture automatically, so it looks consistent on pictures of different sizes, and it shows in the live preview.
7. Output and renaming
File format, where files go, and how they are named
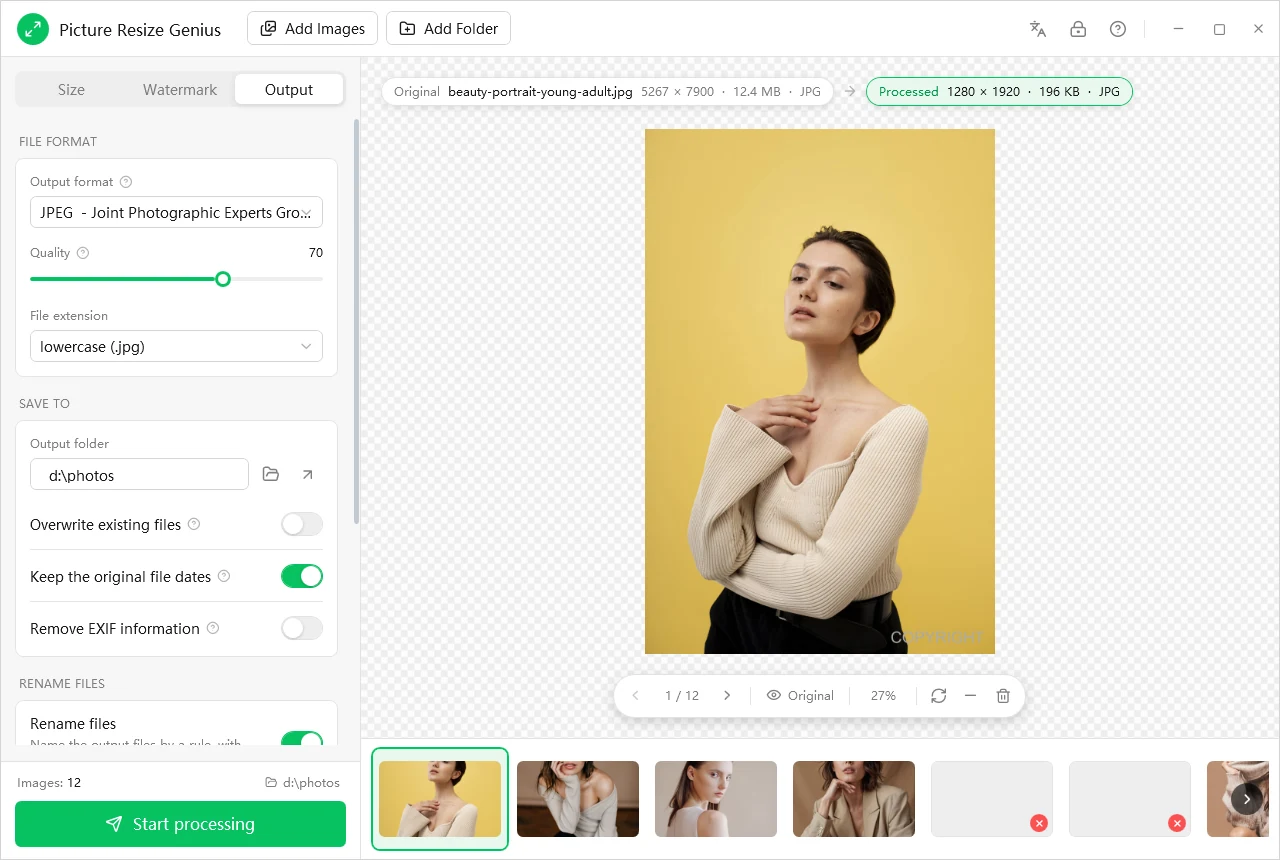
File format
- Output format: keep the original format, or convert to one of more than 60 (JPEG, PNG, WebP, TIFF, BMP, GIF, PSD, PDF and more).
- Quality: for formats that support it (JPEG, PNG, WebP, JPEG 2000 and others).
- File extension: lowercase or uppercase.
Save to
- Output folder: where processed files are written (the folder button browses, the arrow opens it).
- Overwrite existing files: off by default; with it off, a name collision gets an automatic (1), (2) suffix. Source pictures are never overwritten.
- Keep the original file dates: preserves each file’s timestamps.
- Remove EXIF information: strips camera, GPS and timestamp metadata for privacy.
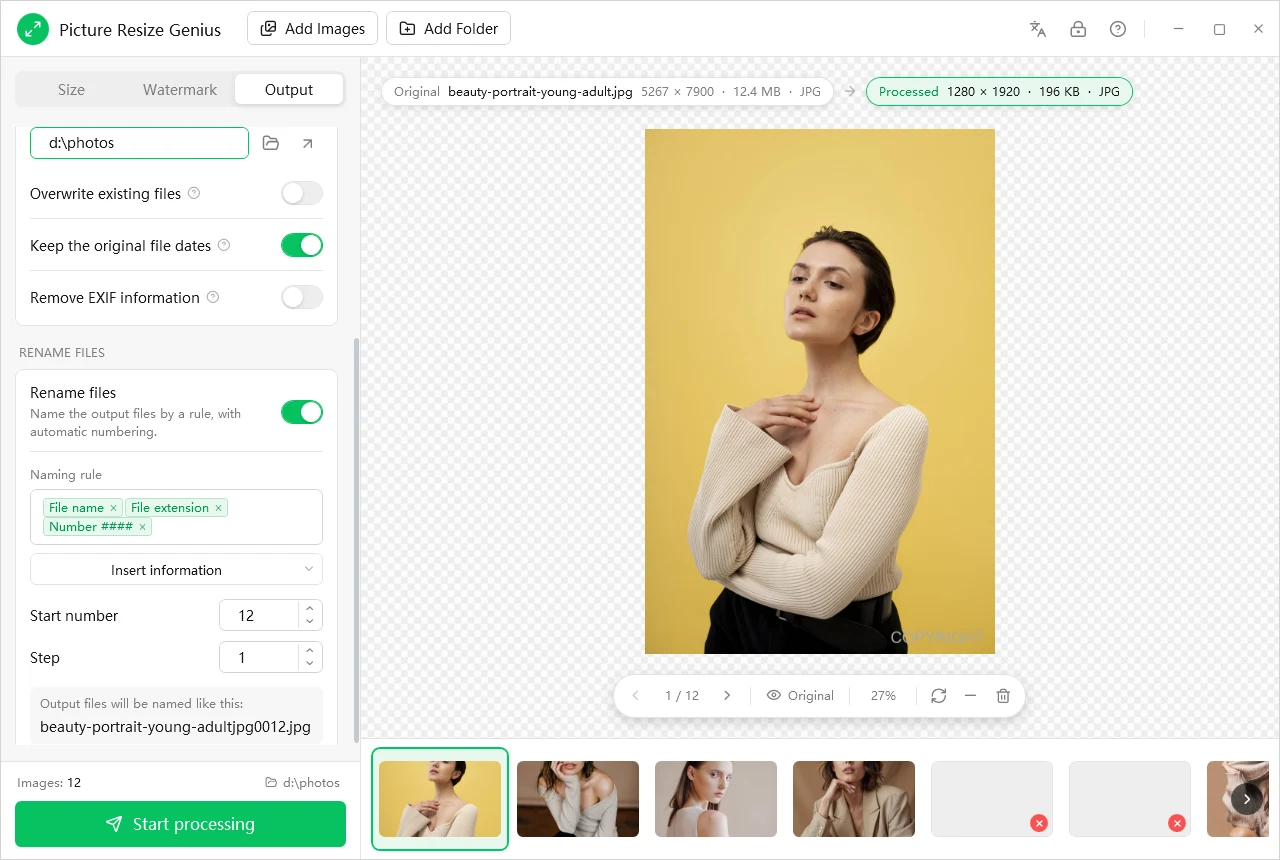
Rename files
- Naming rule: build the name from tokens: File name, File extension, a zero-padded serial number, the modified and original capture date and time, and EXIF fields (camera model, artist, date and time, exposure, F-number, ISO). Remove a token with its x.
- Insert information: a menu to add more tokens.
- Start number and Step: the first serial number and how much it grows per file.
- A live line shows how the output files will be named.
8. Processing
When the settings look right in the preview
- Confirm the Output folder (it is also shown at the bottom of the window).
- Click Start processing at the bottom left.
The program processes the whole batch using all CPU cores and writes the results to the output folder. Your original files are left unchanged.
9. Language, activation and help
The three buttons at the top right
Language
Switch the interface between English, Chinese (Simplified), French and Spanish. It picks your system language on first run.
Activate (lock icon)
Enter your name, e-mail address and license key to register the program and remove the trial limit. The trial lasts 15 days with the full feature set.
Help
Opens help and about information.
Activation needs the internet once. See the activation guide for details.
10. Tips and FAQ
Quick answers to common questions
The whole folder processes with one set of rules. Can I treat some pictures differently?
Every setting applies to all loaded pictures in one pass, which is the point of a batch tool. For pictures that need other rules, run a second batch with other settings: remove the pictures you do not want from the thumbnail strip first.
Pictures from my cloud drive show an error badge.
Files stored in a sync service as online-only (for example Google Drive) have not been downloaded to your PC yet. Make them available offline, or copy them to a local folder, and add them again.
My resized picture did not get bigger.
Only shrink, never enlarge is on by default, so pictures that are already smaller than the target stay as they are. Turn it off on the Size tab to allow upscaling.
Will my originals be changed?
No. Output is always written as new files and the program never overwrites a source image, even with Overwrite existing files on.
Which format should I pick?
JPEG for photos (smaller files), PNG or WebP when you need transparency or sharper graphics, and the same format as the source to keep each picture as it is.
My RAW files were saved as JPEG.
Camera RAW cannot be re-saved as RAW, so those pictures are exported as JPEG automatically, or in the output format you choose.
The output file name looks odd in the example.
The example under the naming rule shows exactly how the next file will be named. Remove a token with its x, add one from Insert information, and check the start number and step.
The Start processing button is grey.
It becomes available when at least one picture is loaded. Add pictures with Add Images or Add Folder, or drag them into the window.
After the trial the program asks me to activate.
The 15-day trial has ended. Click the lock icon at the top right, enter your name, e-mail address and license key and press Activate; the limit is lifted immediately.
Did not find your answer? Email service@iotcrazy.com or use the contact form.